Introduction
In the digital age of real estate, captivating visuals play a crucial role in attracting potential buyers. A skilled real estate photographer can highlight the best features of your home, making it stand out in online listings. To ensure stunning photos that showcase your property in the best light, proper preparation is key. This guide outlines essential steps for preparing your home for a real estate photographer.
1. Clean and Declutter
Before the photographer arrives, thoroughly clean and declutter your home. Cleanliness enhances the overall appeal of your property, and decluttering helps create a sense of space. Tidy up each room, remove personal items, and organize spaces to present a clean and welcoming environment in photographs.
2. Maximize Curb Appeal
The exterior of your home is the first impression potential buyers will have. Ensure that the front yard is well-maintained, the lawn is trimmed, and any outdoor clutter is cleared. Consider adding potted plants or flowers to enhance curb appeal. A visually appealing exterior sets the stage for stunning photographs.
3. Highlight Key Features
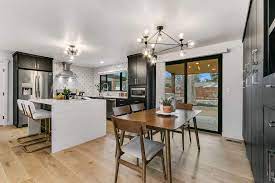
Identify and highlight the key features of your home that you want to showcase in the photographs. Whether it’s a fireplace, unique architectural details, or a spacious kitchen, ensure that these features are clean, well-lit, and free from distractions. The goal is to draw attention to the property’s standout elements.
4. Consider Staging
Staging involves arranging furniture and decor to create an inviting atmosphere. While it’s not necessary to fully stage your home, strategically placing furniture and accessories can add visual interest to photographs. Focus on creating cohesive and balanced compositions that enhance the flow of each room.
5. Check Lighting Conditions
Natural light is a photographer’s best friend. Before the shoot, assess the lighting conditions in each room. Open curtains and blinds to let in as much natural light as possible. Well-lit spaces not only look more inviting but also photograph beautifully. Consider adjusting the time of the shoot to capture the best natural light.
6. Address Minor Repairs
Take care of minor repairs or touch-ups that may be noticeable in photographs. Fix leaky faucets, replace burnt-out light bulbs, and patch up any visible blemishes. Attention to detail ensures that your home appears well-maintained and ready for a new owner.
7. Remove Personal Items
While your personal touches make the house feel like home, it’s advisable to minimize personal items in photographs. Remove family photos, excessive decor, and personalized items. This allows potential buyers to envision themselves in the space, making the home more universally appealing.
8. Clean Windows and Mirrors
Clean windows and mirrors contribute to the overall brightness and clarity of photographs. Ensure that these surfaces are free from streaks and smudges. Clean windows allow more natural light to enter the space, enhancing the quality of the photographs.
9. Stage Outdoor Spaces
If your home features outdoor spaces such as a patio or deck, stage them to highlight their potential. Arrange outdoor furniture, add cushions or throws, and create an inviting atmosphere. Outdoor spaces are valuable selling points, and well-staged photos can capture their full potential.
10. Pets and Pet Items
While many people love pets, not everyone is a pet owner. During the photoshoot, it’s advisable to temporarily relocate pets or their items. This helps create a clean and neutral environment, appealing to a wider audience of potential buyers.
11. Organize Closets and Storage Areas
Potential buyers are often interested in the available storage space. Organize closets, cabinets, and storage areas to present a sense of ample storage capacity. Neatly arranged storage spaces contribute to a positive overall impression.
12. Capture Seasonal Appeal
Consider the season when preparing for a real estate photoshoot. Seasonal touches, such as fresh flowers in spring or warm throws in winter, can add a touch of warmth and season-specific appeal to photographs. Seasonal decor enhances the visual appeal and creates a connection with potential buyers.
13. Coordinate Color Schemes
Ensure a cohesive color scheme throughout your home. Coordinate colors in each room to create a harmonious flow. This doesn’t mean every room has to be the same color, but there should be a visual connection between spaces. A coordinated color palette contributes to a more aesthetically pleasing presentation.
14. Capture Lifestyle Shots
In addition to capturing individual room shots, consider incorporating lifestyle shots that showcase the functionality of your home. This could include shots of a cozy reading nook, a well-appointed kitchen, or a serene backyard. Lifestyle shots help potential buyers envision themselves living in the space.
15. Communicate with the Photographer
Communication with the real estate photographer is essential. Share your vision for the photographs, discuss key features you want highlighted, and let the photographer know if there are specific angles or details you’d like to emphasize. Collaboration ensures that the resulting images align with your goals.
Conclusion
Preparing your home for a real estate photographer involves a combination of cleaning, staging, and attention to detail. By presenting your property in the best possible light, you increase its visual appeal in online listings and attract potential buyers. Following these essential steps ensures that your home is ready for its close-up, creating a positive and lasting impression in the competitive real estate market.

